FREE TARGET PRACTICE - SETUP FIRING RANGE
The Basic Firing Range setup is designed to start your training quickly. It is suitable for all kinds of firearms or laser training devices. Basic Setup will let you focus on shooting fundamentals while getting familiar with the system. You can practice with full-size or scaled targets in simulated distances up to 160 yards (approx. 150 meters) in your home environment. This Setup does not involve ballistic calculations. However, it supports an excellent exercise of target acquisition, breathing, and trigger control. Use single or multiple targets provided by LASERHIT or your targets in any size and shape.
GLOSSARY
Firing Distance: Actual indoor distance from the firing line to the target line.
Target Scale: The ratio between the size of the actual target and the downsized representation of the same target.
Simulated Distance: The result of Firing Distance and Target Scale multiplication.
Instrumental Precision: The smallest increment the app can detect and measure reliably.
MOA (Units): Stands for Minute Of Angle. It is an angular measurement, where 1 MOA equals 1 inch at 100 yards.
MIL/NATO-MIL (Units): Stands for milliradian, based on a radial line (the unit of angle). This angle measurement calculates the distance to the target and the correction for the bullet. 1MIL is equal to 1 meter at 1 kilometer. 0.1 MIL is equal to 1 cm at 100 meters.
Hits Group: The maximum distance, under simulated distance, between any two hits on the target (center-to-center) that occurs during your practice.
First Focal Plane Reticle: A first focal plane (FFP) reticle changes size according to the target size on the phone screen.
BASIC SETUP
BASIC SETUP SPECIFICATION
Distance Units supported: Feet / Yards / Meters
Firing Distance range: 3-30 feet / 1 - 10 yards / 0.9-9.1 meters
Simulated Distance range: 3-480 feet / 1-160 yards / 0.9-148 meters
Target Scale supported: 1:1 - 1:16
Measurements and calculation: Simulated Distance, Instrumental Precision, Hits Group
Units for measurement: Inch, cm, MOA, MIL
Instrumental Precision, angular: up to 0.1 MOA / 0.03 MIL
Instrumental Precision, linear: up to 0.02 Inch / 0.05 cm
First Focal Plane Reticle: Inch / cm / MOA / MIL
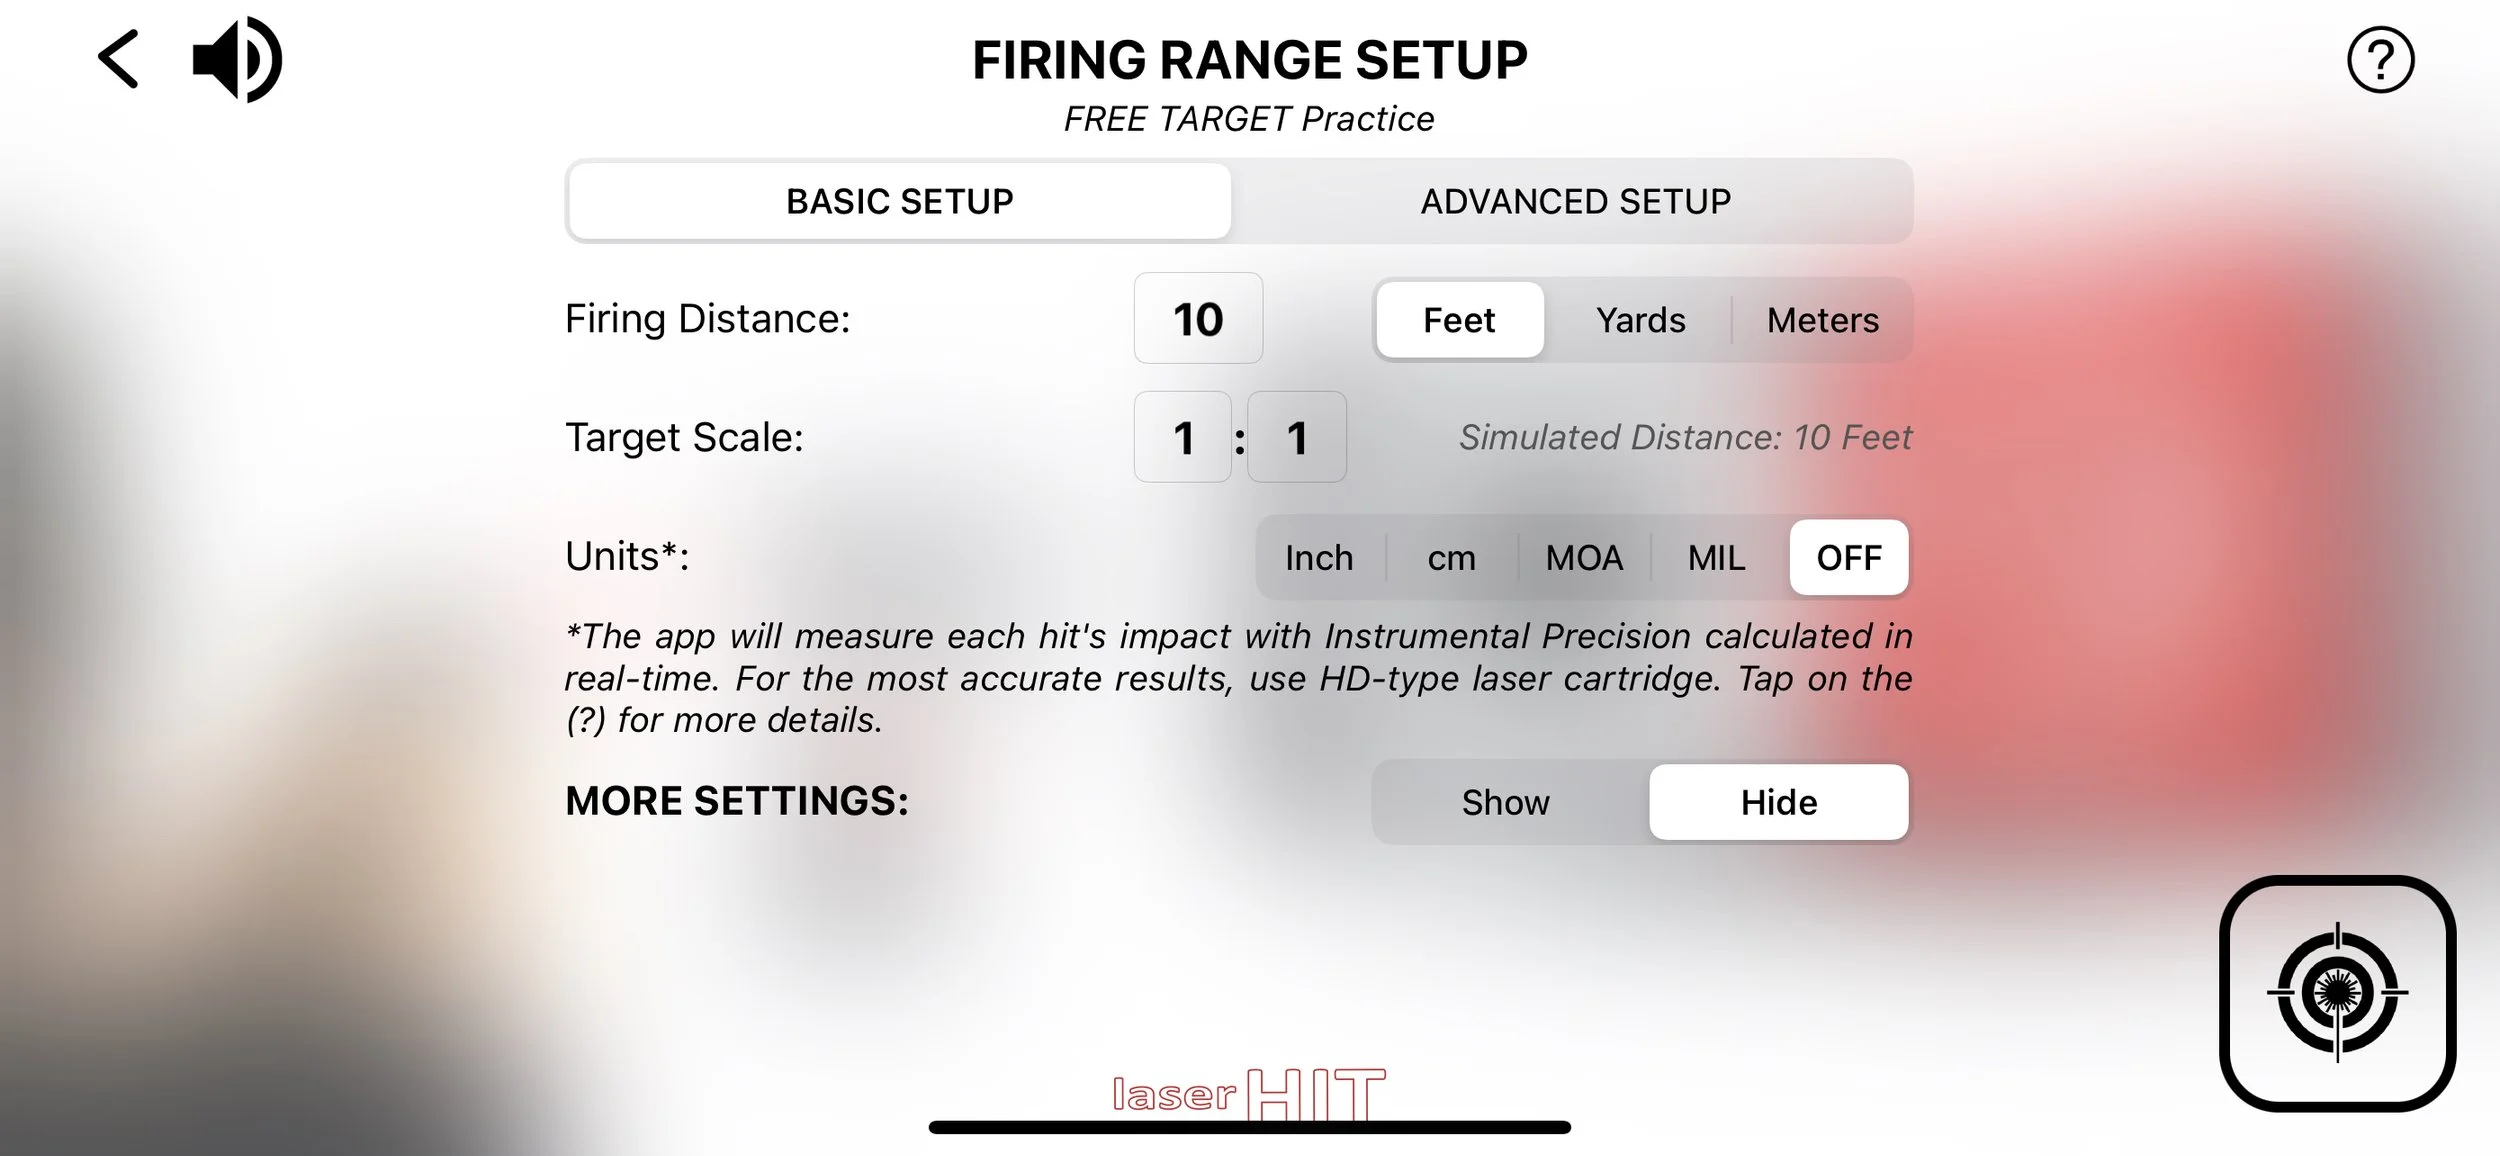
BASIC SETUP SETTINGS
Firing Distance:
Select the units (Feet, Yards, or Meters) first, then enter the actual indoor distance value.
Enter the distance from the Firing line to the Target line (aka distance to the wall where is the target placed) into the entry field.
Tap anywhere on the screen to close the keyboard.
Target Scale: Enter the scale ratio showing on the LaserHIT selected target.
NOTES:
The app will calculate Simulated Distance in selected units.
Scaled ratio limits may apply.
Each LaserHIT Target contains the Real Target reference information.
If you use your target, or the target scale unspecified, enter 1:1.
If this field is not present, then the app will automatically determine the scale of the LaserHIT target and calculate the simulated distance in real-time during practice.
Simulated Distance: The automatically calculated distance at which the original unscaled target appears in your line of sight.
Units: Select the desired units. Measurement Units will apply to Group and Instrumental Precision in real-time Practice.
Group: Select "Show" to present your Hit's Group number on the Results screen. This number will be calculated based on the simulated distance and shown in selected units.
MORE SETTINGS
Step by Step Setup Guide: Select option "Hide" to Skip all instructional pages and minimize the Setup live screens to faster Start Practice access.
Note: if Voice support is still needed, tap on the Sound icon on the Live screen Top panel.
Hit, Size: The slider to resize or enlarge the hit graphical presentation on the phone screen.
Hits, Max: The customized number of hits in the Practice session.
Timeout, Sec.: The customized time setup per Practice session.
Restart Delay, Sec.: The customized delay setup to start Commence Fire for every Practice session.
Sensitivity Settings: Sub-menu to adjust the phone camera sensitivity to the laser registration, indoor light conditions, or phone/target movements.
NOTE: Tap on each Sensitivity title for details about each sensitivity condition and affections of adjustments.
FREE TARGET PRACTICE - SETUP FIRING RANGE
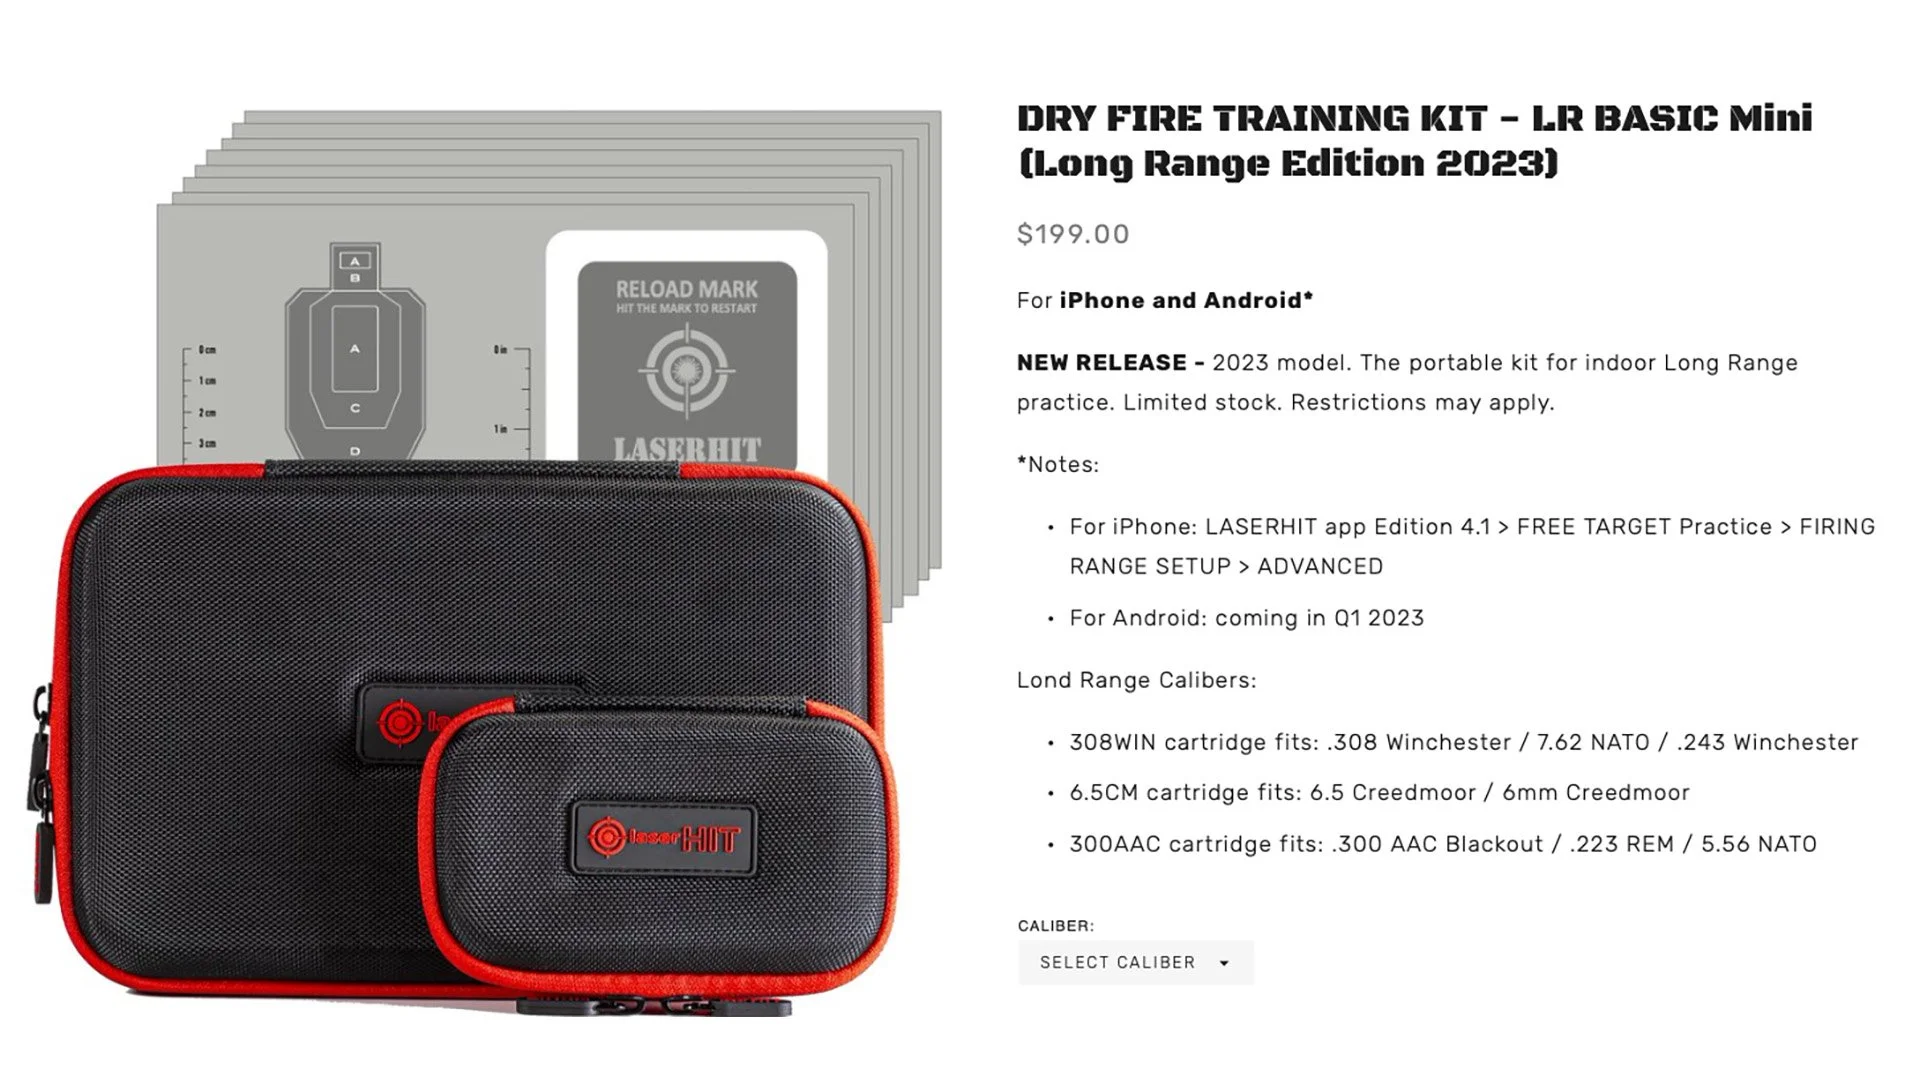
The advanced Firing range setup is designed for experienced users. It is suitable for all kinds of firearms, from handguns to semi-auto or sniper rifles. Advanced setup lets you focus on shooting fundamentals with advanced instrumental measurements. You can practice with full-size or scaled targets in simulated firing range from point blank to extreme long range of one mile in your home environment. This setup does not involve ballistic calculations. However, it supports an excellent exercise of target acquisition, breathing, and trigger control with advanced capabilities to work with extremely small targets. Use targets provided by LASERHIT or your own in any size and shape.
GLOSSARY
Firing Distance: Actual indoor distance from the firing line to the target line.
Target Scale: The ratio between the size of the actual target and the downsized representation of the same target.
Simulated Distance: The result of Firing Distance and Target Scale multiplication.
Instrumental Precision: The smallest increment the App can detect and measure reliably.
Units, TMOA: True Minute Of Angle is a unit of angular measurement equal to 1/60th of 1 degree. 1 TMOA is equal to 1.047 inches at 100 yards.
Units, SMOA/MOA: Shooters Minute Of Angle (Simplified TMOA). 1 SMOA is equal to 1 inch at 100 yards.
Units, MRAD: Milliradian is a unit of angular measurement equal to 1/1000 radian. 1 MRAD is equal to 1.02 meters at 1 kilometer.
Units, MIL/NATO-MIL: (Simplified MRAD). 1 MIL is equal to 1 meter at 1 kilometer. 0.1 MIL is equal to 10 cm at 100 meters.
Hits Group: The maximum distance, under simulated distance, between any two hits on the target (center-to-center) that occurs during your practice.
Windage: Windage measures the horizontal distance from the point of aim to the point of impact at the simulated distance;
Elevation: Elevation measures the vertical distance from the point of aim to the point of impact at the simulated distance;;
First Focal Plane Reticle: A first focal plane (FFP) reticle changes size according to the target size on the phone screen;
Vital Zone Radius: The radius of a circle with a center at the point of aim;
Virtual Spotter: The digital assistance within the App to track and announce your hit placement;
Digital Magnification: Upscale part of the camera with center at the point of aim.
ADVANCED SETUP
ADVANCED SETUP SPECIFICATION
Distance Units: Feet / Yards / Meters;
Target Scale: 1:1 - 1:100;
Firing range: 3-50 feet / 1-16.7 yards / 0.9-15.2 meters;
Simulated Distance: 3-5,000 feet / 1-1,666 yards / 0.9-1,524 meters;
Measurements and calculation: Simulated Distance, Instrumental Precision, Hits Group, Windage, Elevation, Vital Zone hits (Target hits);
Units for measurement: Inch / cm, SMOA / TMOA / MIL / MRAD;
Instrumental Precision, angular: up to 0.1 MOA / 0.03 MIL/MRAD;
Instrumental Precision, linear: up tp 0.02 Inch / 0.05 cm;
First Focal Plane Reticle, units: Inch / cm / SMOA / TMOA / MIL / MRAD;
Digital Magnification: x4 (toggle remotely).
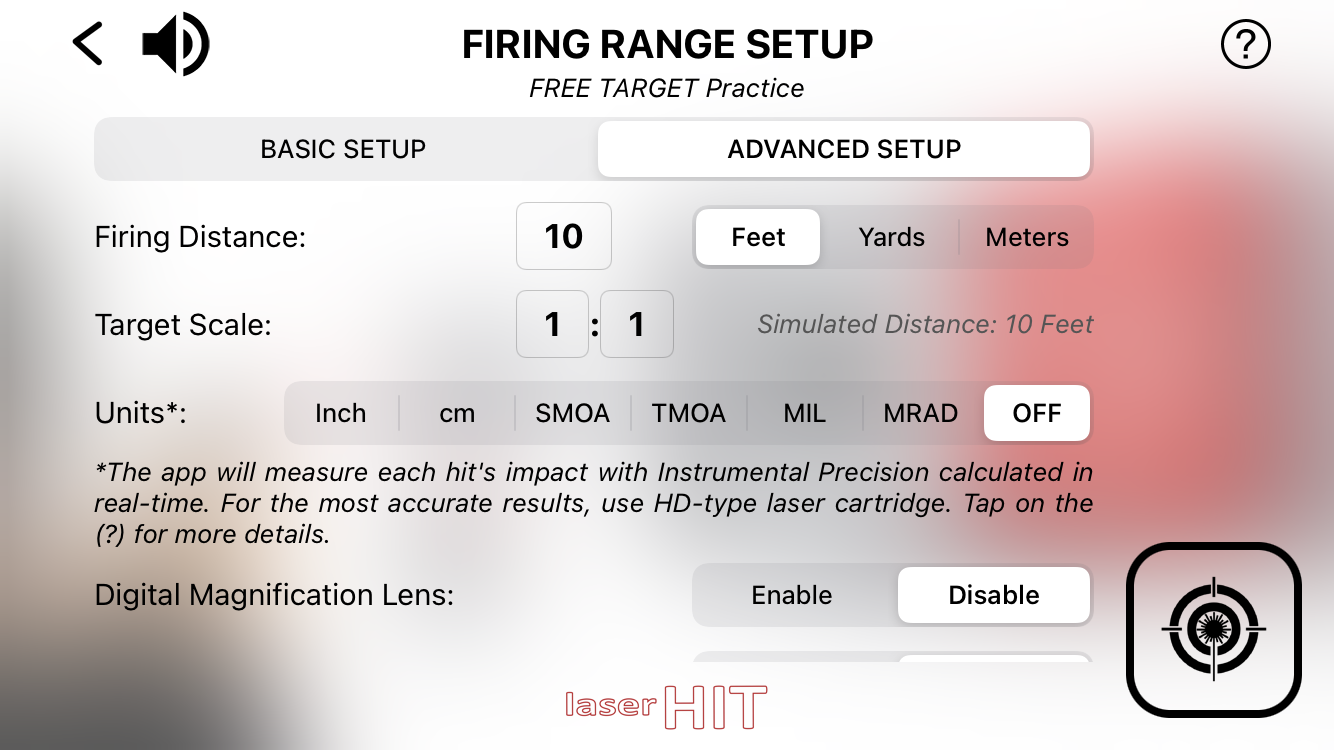
ADVANCED SETUP SETTINGS
Firing Distance:
Select the units (Feet, Yards, or Meters) first, then enter the actual indoor distance value.
Enter the distance from the Firing line to the Target line (aka distance to the wall where is the target placed) into the entry field.
Tap anywhere on the screen to close the keyboard.
Target Scale: Enter the scale ratio showing on the LaserHIT selected target.
NOTES:
The app will calculate Simulated Distance in selected units.
Scaled ratio limits may apply.
Each LaserHIT Target contains the Real Target reference information.
If you use your target, or the target scale unspecified, enter 1:1.
If this field is not present, then the app will automatically determine the scale of the LaserHIT target and calculate the simulated distance in real-time during practice.
Simulated Distance: The automatically calculated distance at which the original unscaled target appears in your line of sight.
Units: Select the desired units. Measurement Units will apply to each hit's Windage-Elevation and Hit's Group with Instrumental Precision calculated in real-time.
Group: Select “Show” to present your Hit’s Group number on the Results screen. This number will be calculated at the simulated distance and shown in selected units.
Windage-Elevation: Select “Show” to present your hit’s Windage-Elevation number on the Results screen. This number will be calculated at the simulated distance and shown in selected units.
Vital Zone Radius: Enter a number in selected units. The Vital Zone will appear as a circle with the center at the crosshair. The hit registered within the vital zone circle during the Practice will be counted as Target Hit.
Target Tracking: Any black object on the phone screen will be considered a target. There are several options to track your target:
Follow: Point the crosshair at the point of aim, and wait until the crosshair turns red. The crosshair will follow the point of aim if its moves. Use this option with full-size or low-scaled targets (target scale 1:10 or less);
Lock On: Point the crosshair within the target shape, and give the App a few seconds to automatically find the target center and lock on it. If the lock succeeds, the crosshair turns red. The crosshair will follow the point of aim if its moves. Use this option with small, high-scaled targets (target scale 1:10 or more).
NOTE: The target height and width should not exceed five times of vital zone radius;
Off: The tracking is disabled.
Virtual Spotter: Select "Hit Placement" to activate each hit confirmation. The Virtual Spotter will announce the target hit (within the vital zone) or the hit's windage and elevation at the simulated distance in selected units.
Digital Magnification Lens: Select Enable, and you can toggle the additional magnification lens to enlarge your last hit four times on the phone screen. Use this option with a single small-scaled Target (target scale 1:50 or more).
NOTE:
To toggle the Magnification Lens during the setup, tap on the phone screen;
To toggle the Magnification Lens during practice, tap on the phone screen or hit anywhere in the target field (not the Reload mark).
MORE SETTINGS
Step by Step Setup Guide: Select option "Hide" to Skip all instructional pages and minimize the Setup live screens to faster Start Practice access.
Note: if Voice support is still needed, tap on the Sound icon on the Live screen Top panel.
Hit, Size: The slider to resize or enlarge the hit graphical presentation on the phone screen.
Hits, Max: The customized number of hits in the Practice session
Timeout, Sec.: The customized time setup per Practice session
Restart Delay, Sec.: The customized delay setup to start Commence Fire for every Practice session.
Sensitivity Settings: Sub-menu to adjust the phone camera sensitivity to the laser registration, indoor light conditions, or phone/target movements.
NOTE: Tap on each Sensitivity title for details about each sensitivity condition and affections of adjustments.
Scaled targets and laser offset
Preamble.
We will be using a rifle with an optic as an example, to stress out the importance of setting up the laser offset while practicing with LaserHIT scaled targets at home. The same principles will be applyed to any sights, optics, and firearms (including handguns).
Scaled targets and human vision.
The scaled (resized) target concept is based on human eye angular vision and optical illusion. How it works: Size down the height and width of any object X-times, place it X-times closer, and to the human eyes, it will appear at the same size as the original object from the original distance.

Resized targets.
Dry firing with the LASERHIT system is a great way to practice long-range shooting in a limited indoor space. You can simulate the long distance between you and the target by proportionally scaling down the target size. For example, you can practice 100 yards shooting from 10 yards in your living room by using a target with a 1:10 scale.

Even more, you can practice 1000 yards shooting in your 10 yards living room range by using a target of 1:100 scale.

Simulated Distance.
You will be prompted to enter indoor range distance (Sight to Target distance) and target scale (Target Scale Factor) during the Setup Firing Range step. The app will automatically calculate your training simulated distance based on your input. For example, you want to practice from 50 yards with a full-size silhouette target of 18”x30". But you have only 5 yards (15 feet) of space in your house. How to achieve your goal? You need to size down your target. 50 yards : 5 yards = 10, where 10 is your Target Scale Factor. So, you need to use the scaled target 1:10. The same principle will work backward. For example, you have 10 feet of open space in your home, and you have scaled target 1:8. What is the maximum distance you can simulate? 10 feet x 8 target scale factor = 80 feet simulated distance
Don't have scaled targets? Download or buy it here: www.laserhit.com/targets
Mechanical offset.
Before you start your Dry Fire practice, you must illuminate the impact of mechanical offset to keep your training results realistic and accurate. What is a mechanical offset? "The spatial difference between the centerlines of the bore of your barrel and optic (or iron sights) is known as mechanical offset." [1].
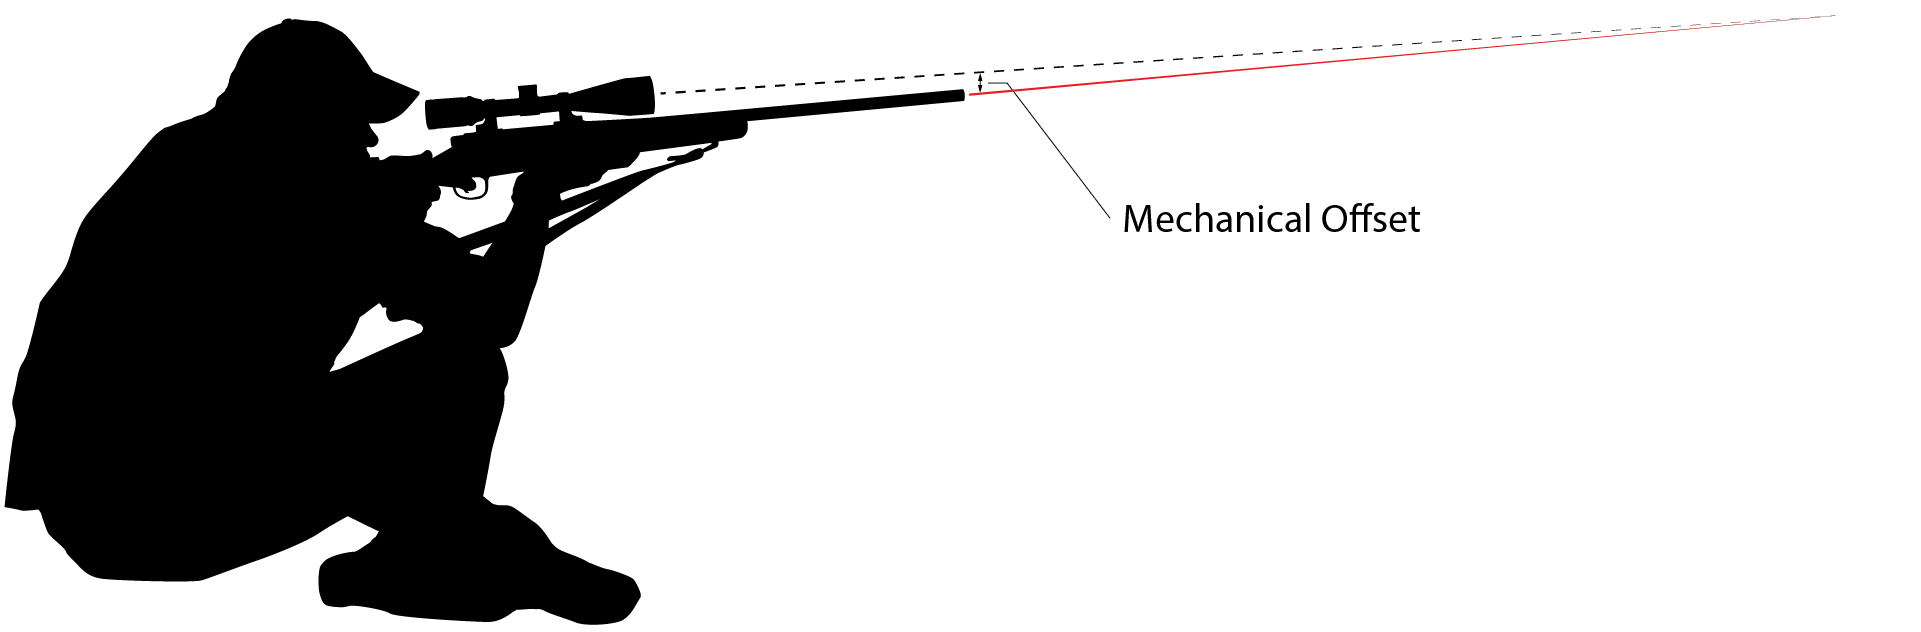
You compensate the difference by zeroing your rifle on a real range by shooting live ammo at a distance known as a "zeroing distance".

When you take a shot from a closer range, the bullet will hit the target lower than you aim.

Then you should aim slightly higher to hit the intended point.

However, the "aim slightly higher" approach doesn't work with resized targets as you expect. You need to aim much higher than you would in the real world.

You may think, "OK, I just crank the turrets, then zero my optic to the point where the laser hit, and it will be fine." Yes, it will work. However, it is a bad idea due to several reasons:
You want to keep your firearm on standby and ready. Zero it once, and don't mess with the sights/optic ever.
Your sights or optic might not be mechanically capable of zeroing that close.
A laser dot on a line of sights will drag your attention and mess with your ability to aim with sights/optics. This issue will worsen when you use a common (generic) laser cartridge with a fat, bright dot. LaserHIT HD-type cartridge will help. However, it will not eliminate the problem.
You anker yourself to the distance. A slight change in the distance will shift the dot up or down dramatically. It will worsen when you practice with a high-rase scope and a tiny 1:100 scaled target. You will always be uncertain and ask yourself: "Why did I miss? Or did I move?"

The LaserHIT solution - Laser Zeroing (Laser Offset).
In the app, we implement an elegant and intuitive solution to eliminate all issues described above. The approach is simple: do not mess with firearm sights and let the app deal with the offset. It works with rifles, handguns, and all types of sights/optics.

You can set the offset with a few easy steps during practice setup or practice session:
Tap on the red cross icon (see picture above);
Select the point of aim;
Shoot at it three times;
Confirm the result, or redo it.
The app will measure the distance between where the laser hit the target and where the POA is, then remember it as your laser cartridge offset and apply it to all future laser hits in your chosen practice.
Laser Offset Benefits.
You don't have to mess with the sights;
You don't have to redo it every setup;
You don't have to worry about ankers yourself to the distance;
You don't have to "aim slightly higher". The hit will show exactly where your sights were when you pulled the trigger;
You can set up the offset at the point blank, but it will work at any distance later on;
The setup offset will eliminate the laser cartridge misalignment (if present). Set up the laser offset from your firing line, and the app will take care of the rest.
Laser Offset Drawbacks.
You need to keep the firearm with sights straight up. Don't tilt it;
You need to redo Laser Offset in case of re-insert the cartridge or after changing the firearm.
Conclusion.
You should zero your rifle the "normal way" before starting the LaserHIT indoor training;
You should not adjust your optic to "zero" the LaserHIT laser cartridge;
You should set up a laser cartridge offset within the LASERHIT app when practicing with scaled targets.
Refferences.
[1] https://www.luckygunner.com
FREE TARGET PRACTICE STEP-BY-STEP SETUP
Common
Rifle With Scope or Red Dot
The app is designed to work with any dark Targets on a white background.
STEP 1. TARGET SETUP
Purpose of the step. Fit the target within the red frame on the next live screen. How to do it. Find the right place where you put your target. It should be a white or light-colored wall without a pattern or reflective objects. Or use a whiteboard, a white poster board, or white cardboard as a white mini-wall. Place the target on the wall and secure all target corners. Place the phone on the tripod, and check that the phone's volume buttons do not get jammed by the holder. Check the mute button to get the sound. Then, place the tripod by the wall one to three feet from the target. Face the rear phone camera toward the target.
Fit the target within the red frame on the phone screen. If necessary, pinch to zoom and slightly tilt or rotate your phone. Tap on the screen to re-focus the blurred image. Important: fill the target within the red frame height and situate it approximately in the middle of the box. You may move the tripod back and forth from the target but stay in the range of 1 to 3 feet.
STEP 2. SETUP RELOAD MARK
Reload mark allowed you to reset the previous results and restart the training session directly from your firing line. What is Reload Mark? Reload Mark is a black rectangle with a specific laser hit pattern. It should always be placed near the target, fully visible on the phone screen, and framed red all the time. All LaserHIT Targets already include the Reload Mark. If you use your target, a LaserHIT Reload mark will be required. Download it from our website.
Give the application a few seconds to find and accept the Reload Mark. Ensure that only one Reload Mark is present on the phone screen, fully visible, and framed in red.
STEP 3. CHECK LIGHTS
Incorrect light setup or light changes on the target area during the practice may cause false hits registration or cease the active session. Purpose of the step: Ensure the target area is not oversaturated. How to do it: The app will run a real-time light analyzer to highlight oversaturated areas that can't detect shots.
Do not touch the phone or tripod and give the application a few seconds to analyze the camera feed. The phone should be standing still to complete the step. Pay attention to the health dot in the lower-left corner. It should turn to solid green. As a result, you should see the target and reload mark without red spots. For the reliable hit registration, the red spots may be present only on the white areas or the background. If this step takes too long, tap on the gear icon to adjust the sensitivity. Please, follow the friendly hints. Do not try to eliminate all red spots. Do not use a light source behind the firing line to avoid moving shadows. Do not place the target close to a TV, as the TV screen may mislead the phone camera.
LASER ZEROING (Optional)
Last optional step: Laser zeroing and gun's sights offsetting. Purpose of the step: Allow to practice in close range without adjusting gun's sights. At the close range, the laser's point of impact will be lower than your aim due to the sights rising over bore. How to do it. Get your gun ready. Pick the point-of-aim on the target and pan the cross-hair over it on the next live screen. Aim at the point-of-aim through the gun's sights and pull the trigger. Repeat three times. Tap on the red cross icon on top of the screen to proceed or continue without zeroing.
Pick the point-of-aim on the target and pan the cross-hair over it. Get your gun ready and proceed to the next step.
From now on, do not touch the phone or tripod until the end of the practice. Wait for a long beep.
Aim at the point of aim through the gun's sights and pull the trigger. Don't look at the laser dot on the target. Aim through the gun's sights. Hit the target three times. Important. Don't tilt the gun. Keep it straight with the sights up.
Offsetting completed. To redo, aim and hit the target. To accept and proceed, aim and hit the reload mark.
TIMELINE
0:00 - Intro
0:23 - Select the target
0:50 - Firing range setup
1:36 - Target setup
2:10 - Reload mark setup
3:03 - How to check lights
3:54 - Laser zeroing
4:40 - The range is hot
5:40 - If the phone moves
5:59 - Features
6:02 - Hits group
6:22 - Instrumental precision
6:36 - Skip hints
7:12 Basic setup specification
7:17 - The end
TIMELINE
0:00 - Intro
0:08 - Extended simulated distance
0: 17 - More angular units
0:28 - Windage and Elevation
0:36 - Vital zone radius
1:07 - Virtual spotter
1:28 - Target tracking. Follow
1:50 - Target tracking. Lock on
2:14 - Digital magnification lens
2:35 - First focal plane reticle
2:55 - Advanced setup specification
3:01 - The end
TIMELINE
0:00 - Intro
0:07 - Must have items
0:12 - LaserHit target
0:24 - Indoor space
0:39 - Decent scope
0:55 - Free Target practice setup
1:10 - Load cartridge
1:13 - Setup practice
1:30 - Setup firing range
2:35 - App. Setup target, reload mark, check lights
3:30 - Laser zeroing
4:50 - Start practice
5:31 - Spotted scope
5:46 - Magnification lens
6:14 - Setup specs
6:25 - The end

TABLE OF CONTENTS
TIME LINE
0:00 - The Intro
0:22 - Select the target
0:49 - Firing Range setup
1:36 - Target setup
2:10 - Reload Mark setup
3:02 - How to check lights
3:53 - Target confirmation
4:37 - Laser zeroing
5:26 - The range is hot
6:00 - If the phone moves
6:25 - The end
TABLE OF CONTENTS
TIME LINE
0:00 - The Intro
0:22 - Select the target
0:41 - Firing Range setup
1:17 - Target setup
1:57 - Reload Mark setup
2:39 - How to check lights
3:32 - Target confirmation
4:12 - Laser zeroing
4:54 - The range is hot
5:21 - If the phone moves
5:56 - The end
TABLE OF CONTENTS
TIMELINE
0:00 - Intro
0:22 - Select the target
0:41 - Firing range setup
1:16 - Target setup
1:57 - Reload mark setup
2:39 - How to check lights
3:31 - Target confirmation
2:39 - How to check lights
3:31 - Target confirmation
4:11 - Laser zeroing
4:53 - The range is hot
5:27 - Restart the session
5:44 - If the phone moves
6:18 - The end